Glow-in-the-dark Woggle
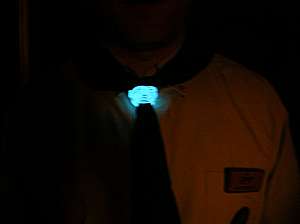
These instructions are for a glow-in-the-dark woggle that should make the wearer WoggleMan (or WoggleGirl), the envy of all they encounter. The light is impressive by night but, like the mobile phone backlight technology that it has sprung from, is barely noticeable in well lit places. It is particularly impressive at camp or at Jamborees where artificial light is usually a rarity. The parts cost around £10-£20 and it takes around half an hour.
You will need
|

|
Instructions
If you buy your EL wire by the metre, without an inverter you will need to construct one. You will need to build an oscillator out of electronics and then step this up to the operating voltage via a suitable transformer - the design of this is beyond the level of this guide, but if you can build a battery powered sine-wave generator then you can probably attempt this.
Your inverter may not have a battery holder attached. If not you will need to buy and attach one; Maplin is a good source of these. If your inverter was originally intended for a 12V supply (such as one designed for a PC case or car interior) you can probably get away with using a PP3 9V battery like I did. Fancy inverters include a flasher unit to flash the wire on and off or even (like one I found at Maplin but which, sadly, they no longer do, or one from The Glow Company) a sound-to-light unit that flashes the wire in time to the music (or your voice).
 Tony McAndrew's from 8th Tynemouth |
The inverter and the battery will sit in your pocket with an ordinary wire running up inside your uniform to the woggle under your chin. There is usually a suitable length of connecting wire already attached between the inverter and the EL wire on pre-assembled units.
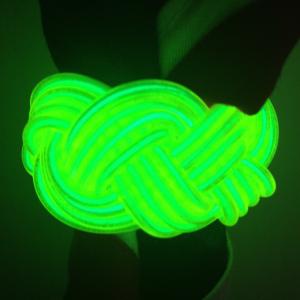
Starting at the end of the neon wire that connects to the normal wire that leads to the inverter you need to tie a Turks Head knot. There are two methods for this: one using a pole or other former (like I used), the other on your fingers. The methods only differ in how you make the initial basic form; it is best to pause once you have reached this stage to sort out how it will end up.
Next you need to adjust the beginnings of your woggle into shape. If you used a broom handle 'former' then the inside diameter of the woggle will be decided for you; if not, now is the time to adjust this by tightening or loosening appropriately. Also, now is the time to adjust the end that connects to the power lead so that it will be on the inside of the woggle
Finally, once you have a basic shape that you are happy with you just follow the strands around the knot threading the free end in and out, adding more layers until the end of the wire is used up. I found I had to tie the knot a second time once I'd found how many turns that diameter gave me so that I got a better knot. If not, you can cut the EL wire to length (add some glue to the end of the tubing to keep it waterproof if you want).
Lower the battery and inverter down through the collar of your uniform, under the chin and pop these into your pocket. Slide the woggle up your neckerchief and you're done!
|
I want to thank you for the instructions and idea for this woggle.
My son and I made a couple this weekend and can't wait until the next evening meeting of Scouts.
We'll make everyone very envious. YIS Brian Piercy Calgary Alberta Canada |
Bagheera
PS. If you do make one, can you let me know so I know I'm not the only one out there with a glow-in-the-dark woggle.


