4th Cambridge
| 4th Cambridge | Roman Catholic | 1910 |
| 4th Cambridge | Jesus Lane Sunday School | 1912 |
| 4th Cambridge | Victoria Road Congregational Church + Harvey Goodwin | 1913 |
| 4th Cambridge | St Luke's | 1914 |
| 4th Cambridge | Kings Boys Club (Kings College Choir) | 1921 |
| 4th Cambridge | Kings College Mission Pack | 1922 |
| 4th Cambridge | Peterhouse | 1924 |
| 4th Cambridge | Cherry Hinton Free Church |
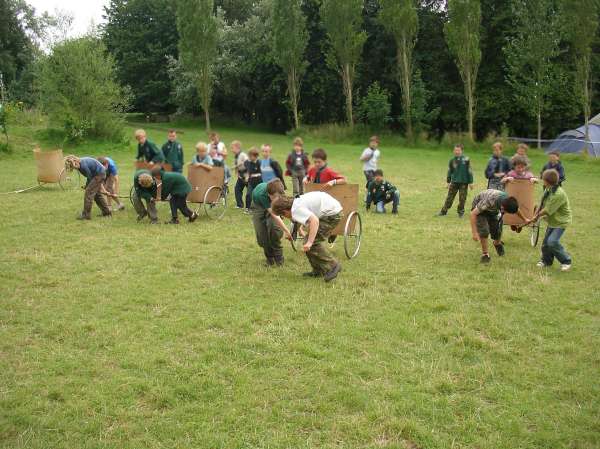
On one of our cub camps with an Ancient Britons theme we built our own Chariots and then raced them!
We made the chariots ourselves, using some donated scrap parts from a local bike shop, some nuts and bolts from Screwfix and some offcuts of wood and hardboard. A full breakdown on how to make a Cub Scout Chariot (or four) is set out below:
Materials needed
| Qty | Item | Our source | Cost |
|---|---|---|---|
8 |
Bicycle wheels | Our local bike shop, Blazing Saddles, donated old wheels that would otherwise have gone in the skip. Just the wheel, without the axle or bearings. Ours were without tyres but you could add these for a smoother ride (eg on tarmac). Two per chariot, ideally each pair are roughly the same size | Free |
4 |
Threaded rods | We used 1m long M10 threaded rods from Screwfix, part number 23368. Alternatively you could use M12 or larger as M10 is a bit on the tin side | £5.80 for 5 |
8 |
Nyloc M10 nuts | These go on the very end of the axle rods and have a nylon ring in to stop them coming undone eg Screwfix part number 11514. Alternatively you could just use more plain nuts done up against each other | £2.40 |
24 |
Plain M10 nuts | Two between the chariot and each wheel, one on the outside (which the nyloc locks against) eg Screwfix part number 19879 | £2.50 for 100 |
16 |
Large washers | Two each wheel, one on the inside, one on the outside eg Screwfix part number 14327. Not strictly needed but we found they helped overcome shortcomings elsewhere | £0.45 for 10 |
16 |
Small washers | It's overkill probably to use so many, but they're cheap and you can only buy them in bulk eg Screwfix part number 17038 | £2.00 |
16 |
10mm pipe clips | Round clips used to clip pipes and wires to walls or wood. These hold the axle to the baseplate eg Screwfix part number 15716. Alternatively, you could use 'U' bolts | £2.30 |
4 |
Poles to pull | Scout staves from stores are ideal for this - smooth, supple, no splinters, take lashings well, about the right length | Free |
4 |
Offcuts of MDF | I had some 15mm MDF at home left over from some DIY project or other but something solid they can stand on that the axle and pulling rod can be attached to eg 1200x600x12mm MDF from B&Q | Free (£7.30) |
4 |
Small sheets of hardboard | These were in my garage, saved from when I took up some old lino which had hardboarding underneath but it's cheap enough to buy eg 1200x600 hardboard from B&Q | Free (£1.80) |
Bag |
Hardboard nails | I had a bag of these small copper nails left over from a DIY flooring project, but again, they're cheap to buy eg Hardboard Nails from B&Q | Free (£1.30) |
Tub |
Grease | We bought the cheapest pot of big thick squidgy grease we could find at Halfords. Comma Multi Purpose I think | £5.50 |
Tub |
Anti-grease handwipes | The cubs loved getting grease right up to their armpits. Special impregnated handwipes help get it off when you're on camp or away from industrial strength washing facilities. We used something like Swarfega Heavy Duty Handwipes from Halfords | £6.00 |
| Total for four chariots | £27.40 |
||
Preparation at home
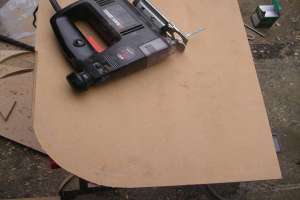 |
Ideally using a jigsaw, cut curved edges to the front of each baseplate, which the driver will stand (or kneel) on. This needs to be a fairly smooth curve to take the hardboard which'll be nailed to it's front and down the sides, and about 40-60cm wide. The axles are 1m long which leaves 10-15cm each side for the wheels |
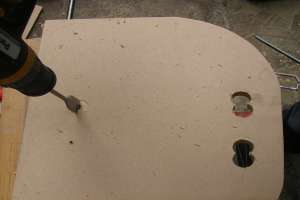 |
Drill four reasonaly large holes through which we'll lash the pole used to pull the chariot. We used scout staves lashed with sisal for this. Unlike me you'll probably get the holes at the front right first time (the narrower ones). Remember to leave a gap at the back where the axle goes |
| Before camp (or the building session) you'll need to source the wheels by be-friending local bike shops (remind them that cubs and scouts are at just the right age to be buying their first serious bike) and buying (or sweet-talking) the nuts and bolts from your local hardware store. You'll also need to source some tools: enough hammers and spanners and some marker pens or other decorating materials | |
Making the chariots
 |
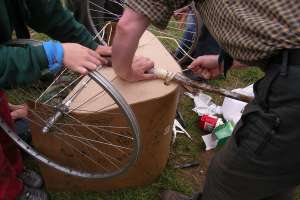
Clip the 1m long threaded rod axle onto the bottom of the base plate using lots of the pipe clips. In the races we found these tended to bend and come off, so you might want to explore using 'D' bolts instead (but the axles bent on yet others, so it may not be worth it) |
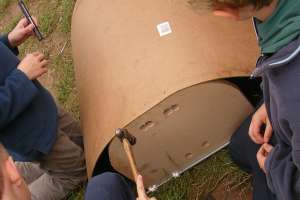 |
Bend the hardboard round the baseplate (hence the curves cut earlier) and put in a nail every cm or so. It might be worth having some larger-headed nails for the last few cm each side - we found the ends kept coming undone and solved this with the large washers as we didn't have any other nails. |
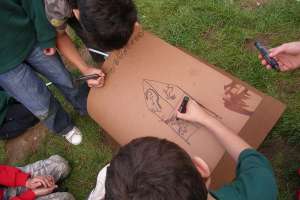 |
Whilst the nailing is being done the rest of the chariot team can start decorating the visible part of the chariot - the hardboard forms the upright front wall. A few quick words about heraldic, celtic and iron age symbols and the cubs were off, coming up with some spectacular designs |
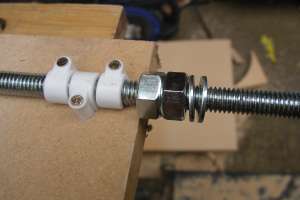 |
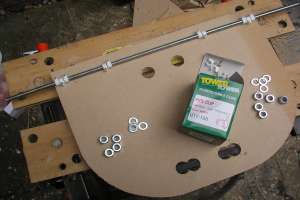
Now it's time to add the inside sets of nuts. Two nuts are done up against the hardboard (not shown) and each other so they don't come undone and then a couple of washers were added (we had hundreds). For the later chariots we added a large washer between the inside nut and the hardboard to help keep it in place and another between the nuts and the wheel on wobbly wheels |
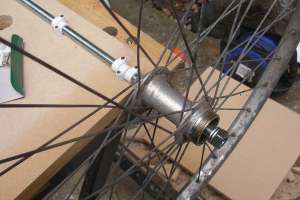 |
Slather the axle in lots of lovely smessy grease and squish some into the wheel (and between your fingers, in your hair .. just not on the tents or sleeping bags!). Then slide on the wheel. Add a couple more washers and a nut. Do this up finger tight - if you use a spanner and do it too tight the wheel won't turn |
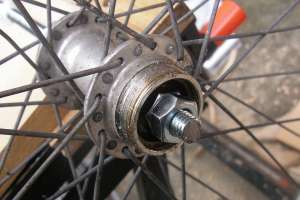 |
Now add a second nut and do this one up hard against the first one, so that they won't work loose. We added a large washer at this point on some wheels where the hole for the axle was too large and the wheel wobbled. Then we added the locknut (which also helped cover the sharp end of the axle) |
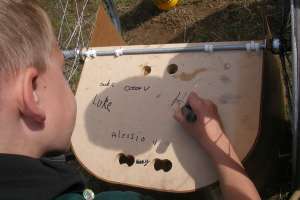 |
All the members of each chariot team proudly signed the bottom of their chariot |
 |
Finally, lash a stave or other pole for pulling onto the bottom of the baseplate using the holes drilled earlier. We found that putting a binding around the stave before lashing helped stop it just pull out of the lashing, and having a leader help out at this stage was important too as the lashings need to be tight |
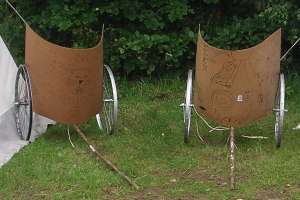 |
The finished article! |
Racing them
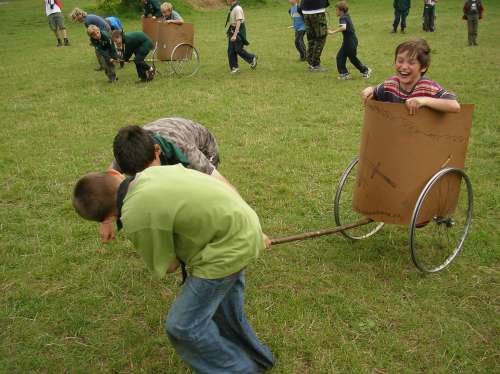
We found that they lasted reasonably well in straight lines but turning corners at speed meant the axles just bent or ripped out of the plastic clips (particularly when they had leaders on-board!). You can use the chariots afterwards to help caddy your water containers about but we found that they nearly all eventually died after a short but happy life. I hope you have as much fun as you can see we did!
If you do build some chariots, please let me know how it went and in particular anything that you felt helped improve the design
Bagheera
